One of the biggest sense of milestones you will accomplish would be learning how to use the “big kid” machines. Before architecture the only machine I knew how to use was the drill press.
I was deathly afraid of the table saw. To an extent, I still remain vigilant because I like to keep my fingers intact. But now I am considerably more confident about woodwork. How grown up and incredibly sexy I feel!
You know what is even more sexy? The laser cutter.

So yes, even though my first 5 iterations of “laser cuts” were an absolute and dismal failure there are some lessons I learned that I feel would be immensely beneficial to remember. Here are some things I wanted to share.
the experiences
My first experiences with the laser cutter were absolutely disappointing in that I had nothing ‘worthwhile’ to share for our little desk crits today.
I used 4 materials for 5 iterations:
(a) chipboard 1/8″
(b) cardboard 1/8″
(c) basswood 3/32″
(d) foam 3/16″
(e) foam 3/16″.
With regards to the cardboard and the foam, the light airy texture made it impossible to work with fine detail and thus thin cut lines disintegrated to nothingness.
implication for the future
- foam and cardboard material will work for large scale modeling (ability for fine detail not yet determined although doubtful)
- intricate details should have at least 0.2″ thickness and be cut in a dense material such as basswood, or chipboard. I am assuming museum board and vellum will also work to a certain degree.
- it’s possible to start a fire in the shop if the laser speed is not fast enough as it will be forever going again and again on the same spot…
the technical – laser cutting with a Rhino file
- export Rhino file to an AutoCad Exchange file (.dxf)
- open in AutoCad
- save as drawing- in the pop up select 2004 dxf file
- open the window file explorer. Right click on the file, open with Corel Draw.
- in Corel Draw, delete bounding box that was drawn in Rhino
- set up the page layout > page layout > page set up> ok
- file ‘print’
- put material inside laser cutter (turn on machines)
- in Corel Draw, turn all the colors except red to read as “skip” (or depending on how you want to do it)
- red = cut
- blue = etch
- apply settings
- click on materials database in the left corner
- select your material, change the thickness of it, ok. Print.
after a bit of research after today, I realized that some instructions ask that you specify an extra 3mm height to compensate for the mat on the cutting table (i.e., if your material measures 3mm you should specify the height as 6mm)
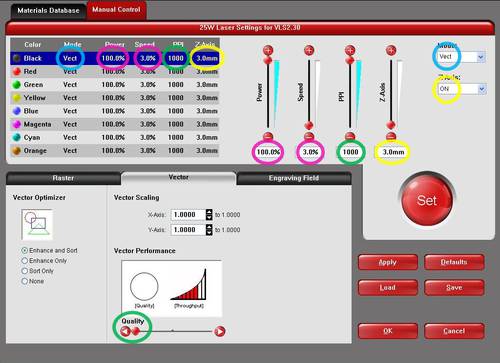
yellow circles: height of cutting material!
purple circles: energy for cutting as product of speed and power. This is crucial!
blue circles: follow vector trajectories for your cutting objects (instead of line-by-line rastering as for images/pictures).
green circles: set high resolution for precise cutting jobs (or low resolution for high throughput which is not what we typically want). –link


